In May of this year, I took a new day job that required me to travel quite a bit. While I love the opportunity to visit new places and get to know my teammates better, it did not leave me a lot of time or energy for designing or sewing. I had to take a break to focus on what really pays the bills and say I'll BRB to my side-gig.
A few months in now, my travel schedule is slowing down and I have some time on the weekends to renew my passion for bagmaking. I have drafted a few small patterns that might make great holiday gifting project to release later this year, but my next release will be the BRB Bowler Bag, scheduled to go live on Tuesday, October 15th at 10 AM CST. Why am I sharing this now? This gives you a couple of weeks to order any hardware you need and pick your fabric to get started making your bag right away!
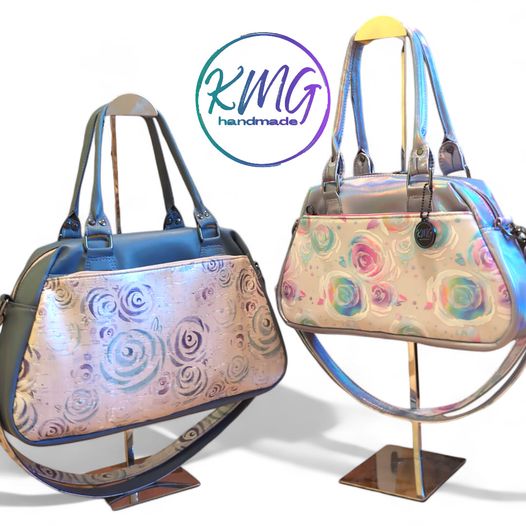
The BRB Bowler Bag will come with instructions for two size options. The larger (OG) will fit up to an 11" iPad in it, making it a perfect "personal item" bag when I have to travel again. The mini is slightly smaller for everyday use but has all the same pockets. With 3 exterior pockets and 2 interior pockets, this bag will keep all your stuff organized and easy to find.
I love the assembly of this pattern so much that I have made 7 of them so far during testing and it will be a featured item at my next market for sure. This pattern includes rolled handle techniques to elevate the look of the bag, but can also be made with simple webbing or quilting cotton handles for a more casual look. With easy to follow instructions, full color photos to follow along on your device, templates for odd shaped pieces and a video tutorial, even an enthusiastic beginner bagmaker could make this bag and learn a lot of new skills along the way. This bag finishes by binding from the top points around the curved bottom edge to provide even more structure. For the best structure at the top of the bag, I recommend using foam as your stabilizer. The front pocket is a combination hidden zipper pocket/slip pocket. I recommend water-resistant (domestic machine friendly) for the lining pieces so that both sides look the same. www.moremeknow.com carries this in many beautiful colors and I also LOVE her hardware for this bag. The material shown here are all from Lauren's shop as well.
This pattern uses the following hardware:
2 - 1" swivel clips
1 - 1" sliding adjuster
2 - 1" D-rings
4 - 1" Rectangle Rings
1 - Magnetic Snap Set
1 - 1/2" Swivel Clip
11 - Rivets or Chicago Screws
4 - Purse Feet (optional)
I also use the following while making this bag:
1/8" DST for zippers and the rolled handles
3/8' DST for raw-edged straps
1 - 18" x 54" roll of raw edge material (cork, faux leather, vinyl, jelly vinyl) for handle connectors, zipper/keyminder overlay, pocket edging, interior slip pocket, straps and handles (everything else you can use cotton or canvas to reduce bulk for domestic machines)
Edge Paint (optional) to finish raw edges
1/2 Y of fabric for main body and gusset of the exterior
1/2 Y of accent fabric for exterior pockets
1/2 Y of lining fabric for interior main body, gusset and pocket linings
22" of 3/8" cording for the rolled handles
Bias Binding or Grosgrain Ribbon works great for binding this bag
Please be sure to join the FB group so you can share your makes with us when you finish! I love to see the fabric you chose for this design and how it reflects your personal style!


2 comments
The pattern is available now in the PDF Patterns Collection on the website!
How can I get the pattern for THE BRB Bowler bag